# pytorch中的grid_sample
# grid_sample
直译为网格采样,给定一个mask patch,根据在目标图像上的坐标网格,将mask变换到目标图像上。
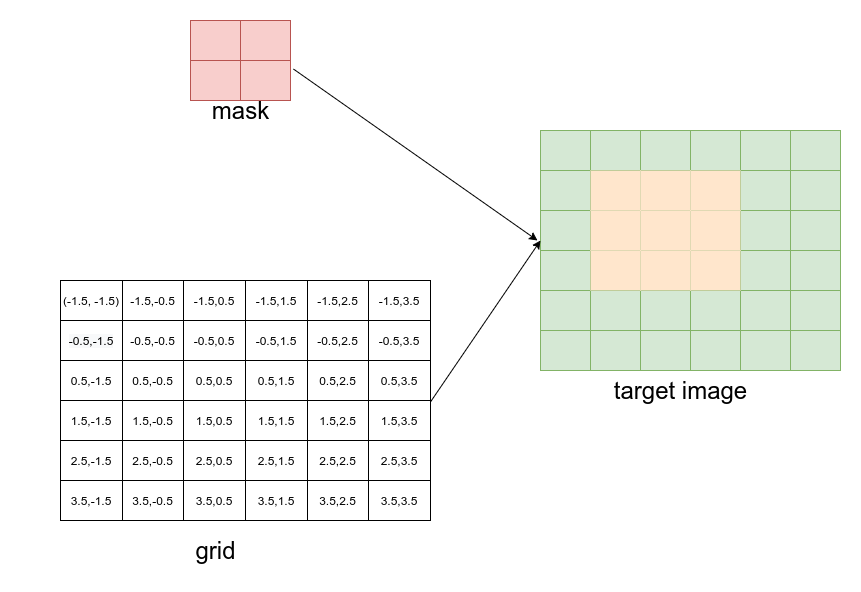
如上图,是将一个2x2的mask根据坐标网格grid变换到6x6目标图像x0 y0 x1 y1 = 1,1,3,3的位置上,值得注意的是grid是经过运算得到的坐标网格,mask在target image对应位置的左上角处坐标应该为-1,-1,右下角处坐标应该为1,1,目标图像对应位置的像素值由mask通过插值得到。
知道了grid_sample的原理,再来看下torch中的函数。
# grid_sample函数原型
torch.nn.functional.grid_sample(input,
                                grid,
                                mode='bilinear',
                                padding_mode='zeros', align_corners=None)
input输入image patch,支持4d或5d输入。为4d时shape为grid坐标网格,当input为4d时其shape为shape为N,C,H_{out},W_{out},对于输出的位置output[n, :, h, w],‵grid[n, h, w]是二维向量,指定了其对应的input上的位置。output[n, :, h, w]根据‵grid[n, h, w]指定的对应input位置上的像素插值得到。grid指定了在input输入维度上标准化后的坐标大小,input左上角对应的应该是-1,-1,右下角对应的是1,1mode插值方式,'bilinear' | 'nearest' | 'bicubic'padding_mode,在(-1,1)外的输出图像上的像素值处理方式'zeros' | 'border' | 'reflection'align_corners:是否对齐角
# 实例
以将一个100x100的mask,网格采样到500x300的图像上(x,y,w,h)=(100, 100, 100, 200)为例,看一下grid_sample是如何使用的。
先计算grid,
import torch
import numpy as np
import cv2
import torch.nn.functional as F
import matplotlib.pyplot as plt

h, w = 300, 500
x0, y0, x1, y1 = torch.tensor([[100]]), torch.tensor([[100]]), torch.tensor([[200]]), torch.tensor([[300]])
N = 1
x0_int, y0_int = 0, 0
x1_int, y1_int = 500, 300
img_y = torch.arange(y0_int, y1_int, dtype=torch.float32) + 0.5
img_x = torch.arange(x0_int, x1_int, dtype=torch.float32) + 0.5
img_y = (img_y - y0) / (y1 - y0) * 2 - 1
img_x = (img_x - x0) / (x1 - x0) * 2 - 1

gx = img_x[:, None, :].expand(N, img_y.size(1), img_x.size(1))
gy = img_y[:, :, None].expand(N, img_y.size(1), img_x.size(1))
grid = torch.stack([gx, gy], dim=3)
这里使用的是mask在目标图像上的大小来对grid归一化的。
mask = np.zeros((100, 100), dtype=np.uint8)
ct = np.array([[50, 0],[99, 50], [50, 99], [0, 50]], dtype=np.int32)
mask = cv2.drawContours(mask, [ct], -1, 255,  cv2.FILLED)
plt.figure(1)
plt.imshow(mask)
mask = torch.from_numpy(mask)
masks = mask[None, None, :]

if not torch.jit.is_scripting():
    if not masks.dtype.is_floating_point:
        masks = masks.float()

img_masks = F.grid_sample(masks, grid.to(masks.dtype), align_corners=False)
plt.figure(2)
plt.imshow(img_masks.squeeze().numpy().astype(np.uint8))
根据grid将mask映射到目标图像上的指定区域指定大小。
grid_sample的使用,如Mask RCNN将对象实例分割的mask映射到原图像尺寸上。
# 手动实现一个使用双线性插值的例子
- 输入图像
I (1×1×4×4)
I = [[[
    [1,  2,  3,  4],
    [5,  6,  7,  8],
    [9, 10, 11, 12],
    [13,14, 15,16]
]]]  # shape (N=1,C=1,H=4,W=4)
- 网格 grid (1×2×2×2)
grid = [[
    [[-0.5, -0.5],   # 输出(0,0) 对应输入的浮点坐标 (1.5, 1.5)
     [ 0.5, -0.5]],  # 输出(0,1) 对应输入的浮点坐标 (2.5, 1.5)
    [[-0.5,  0.5],   # 输出(1,0) 对应输入的浮点坐标 (1.5, 2.5)
     [ 0.5,  0.5]]   # 输出(1,1) 对应输入的浮点坐标 (2.5, 2.5)
]]  # shape (1,2,2,2)
- 坐标换算(归一化 → 浮点像素)
PyTorch 内部公式(align_corners=False):
x’ = 0.5 * (x_grid + 1) * (W_in - 1)
y’ = 0.5 * (y_grid + 1) * (H_in - 1)
这里
x’ = 0.5*(x_grid+1)*3
y’ = 0.5*(y_grid+1)*3
把 4 个 grid 坐标全部换算完:
(-0.5,-0.5) → (0.75, 0.75)
( 0.5,-0.5) → (2.25, 0.75)
(-0.5, 0.5) → (0.75, 2.25)
( 0.5, 0.5) → (2.25, 2.25)
- 详细算第一个点,其余点把结果直接列出来,以第一个点 (0.75, 0.75) 为例
# 四个相邻整数坐标
x0 = floor(0.75) = 0,  x1 = ceil(0.75) = 1
y0 = floor(0.75) = 0,  y1 = ceil(0.75) = 1
# 四个角
I00 = I[0,0] = 1
I01 = I[0,1] = 2
I10 = I[1,0] = 5
I11 = I[1,1] = 6
# 计算权重
dx = 0.75 - 0 = 0.75
dy = 0.75 - 0 = 0.75
# 权重
w00 = (1-dx)*(1-dy) = 0.25*0.25 = 0.0625
w01 = (1-dx)*dy     = 0.25*0.75 = 0.1875
w10 = dx*(1-dy)     = 0.75*0.25 = 0.1875
w11 = dx*dy         = 0.75*0.75 = 0.5625
# 加权求和
v = w00*I00 + w01*I01 + w10*I10 + w11*I11
  = 0.0625*1 + 0.1875*2 + 0.1875*5 + 0.5625*6
  = 0.0625 + 0.375 + 0.9375 + 3.375
  = 4.75
所以输出(0,0)位置得到 4.75,重复以上计算过程,把 4 个点都算完:
| 输出位置 | 浮点坐标 | 插值结果 |
|---|---|---|
| (0,0) | (0.75,0.75) | 4.75 |
| (0,1) | (2.25,0.75) | 6.25 |
| (1,0) | (0.75,2.25) | 12.75 |
| (1,1) | (2.25,2.25) | 14.25 |
直接跑 PyTorch验证,可以得到相同的结果:
import torch
import torch.nn.functional as F
I   = torch.arange(1,17,dtype=torch.float).view(1,1,4,4)
grid = torch.tensor([[[[-0.5,-0.5],[0.5,-0.5]],
                      [[-0.5,0.5],[0.5,0.5]]]])
out = F.grid_sample(I, grid, align_corners=False)
print(out)
1.https://pytorch.org/docs/stable/generated/torch.nn.functional.grid_sample.html (opens new window)